Using Chinda LLM 4B with n8n - Complete Workflow Automation Guide
🎯 Introduction
Chinda LLM 4B is an open-source Thai language model developed by the iApp Technology team, capable of thinking and responding in Thai with high accuracy using the latest Qwen3-4B architecture.
n8n is a powerful workflow automation tool that allows you to connect different services and automate tasks without coding. By integrating Chinda LLM 4B with n8n, you can create sophisticated AI-powered workflows that process Thai language data automatically.
🚀 Step 1: Installing n8n
Method 1: Using npm (Recommended for Development)
Install Node.js (if not already installed)
Download and install Node.js from https://nodejs.org/
Install n8n globally:
npm install n8n -g
Start n8n:
n8n start
Method 2: Using Docker (Recommended for Production)
Pull and run n8n Docker container:
docker run -it --rm \
  --name n8n \
  -p 5678:5678 \
  -v ~/.n8n:/home/node/.n8n \
  n8nio/n8n
Method 3: Using npx (No Installation Required)
npx n8n
Verify Installation
After starting n8n, open your browser and go to:
http://localhost:5678
You should see the n8n interface with a welcome screen.
🔍 Step 2: Setting Up Chinda LLM 4B
Option A: Using Ollama Backend (Recommended)
Install Ollama:
curl -fsSL https://ollama.com/install.sh | sh
Download Chinda LLM 4B:
ollama pull iapp/chinda-qwen3-4b
Start Ollama API server:
ollama serve
The API will be available at http://localhost:11434
Option B: Using Direct API Endpoint
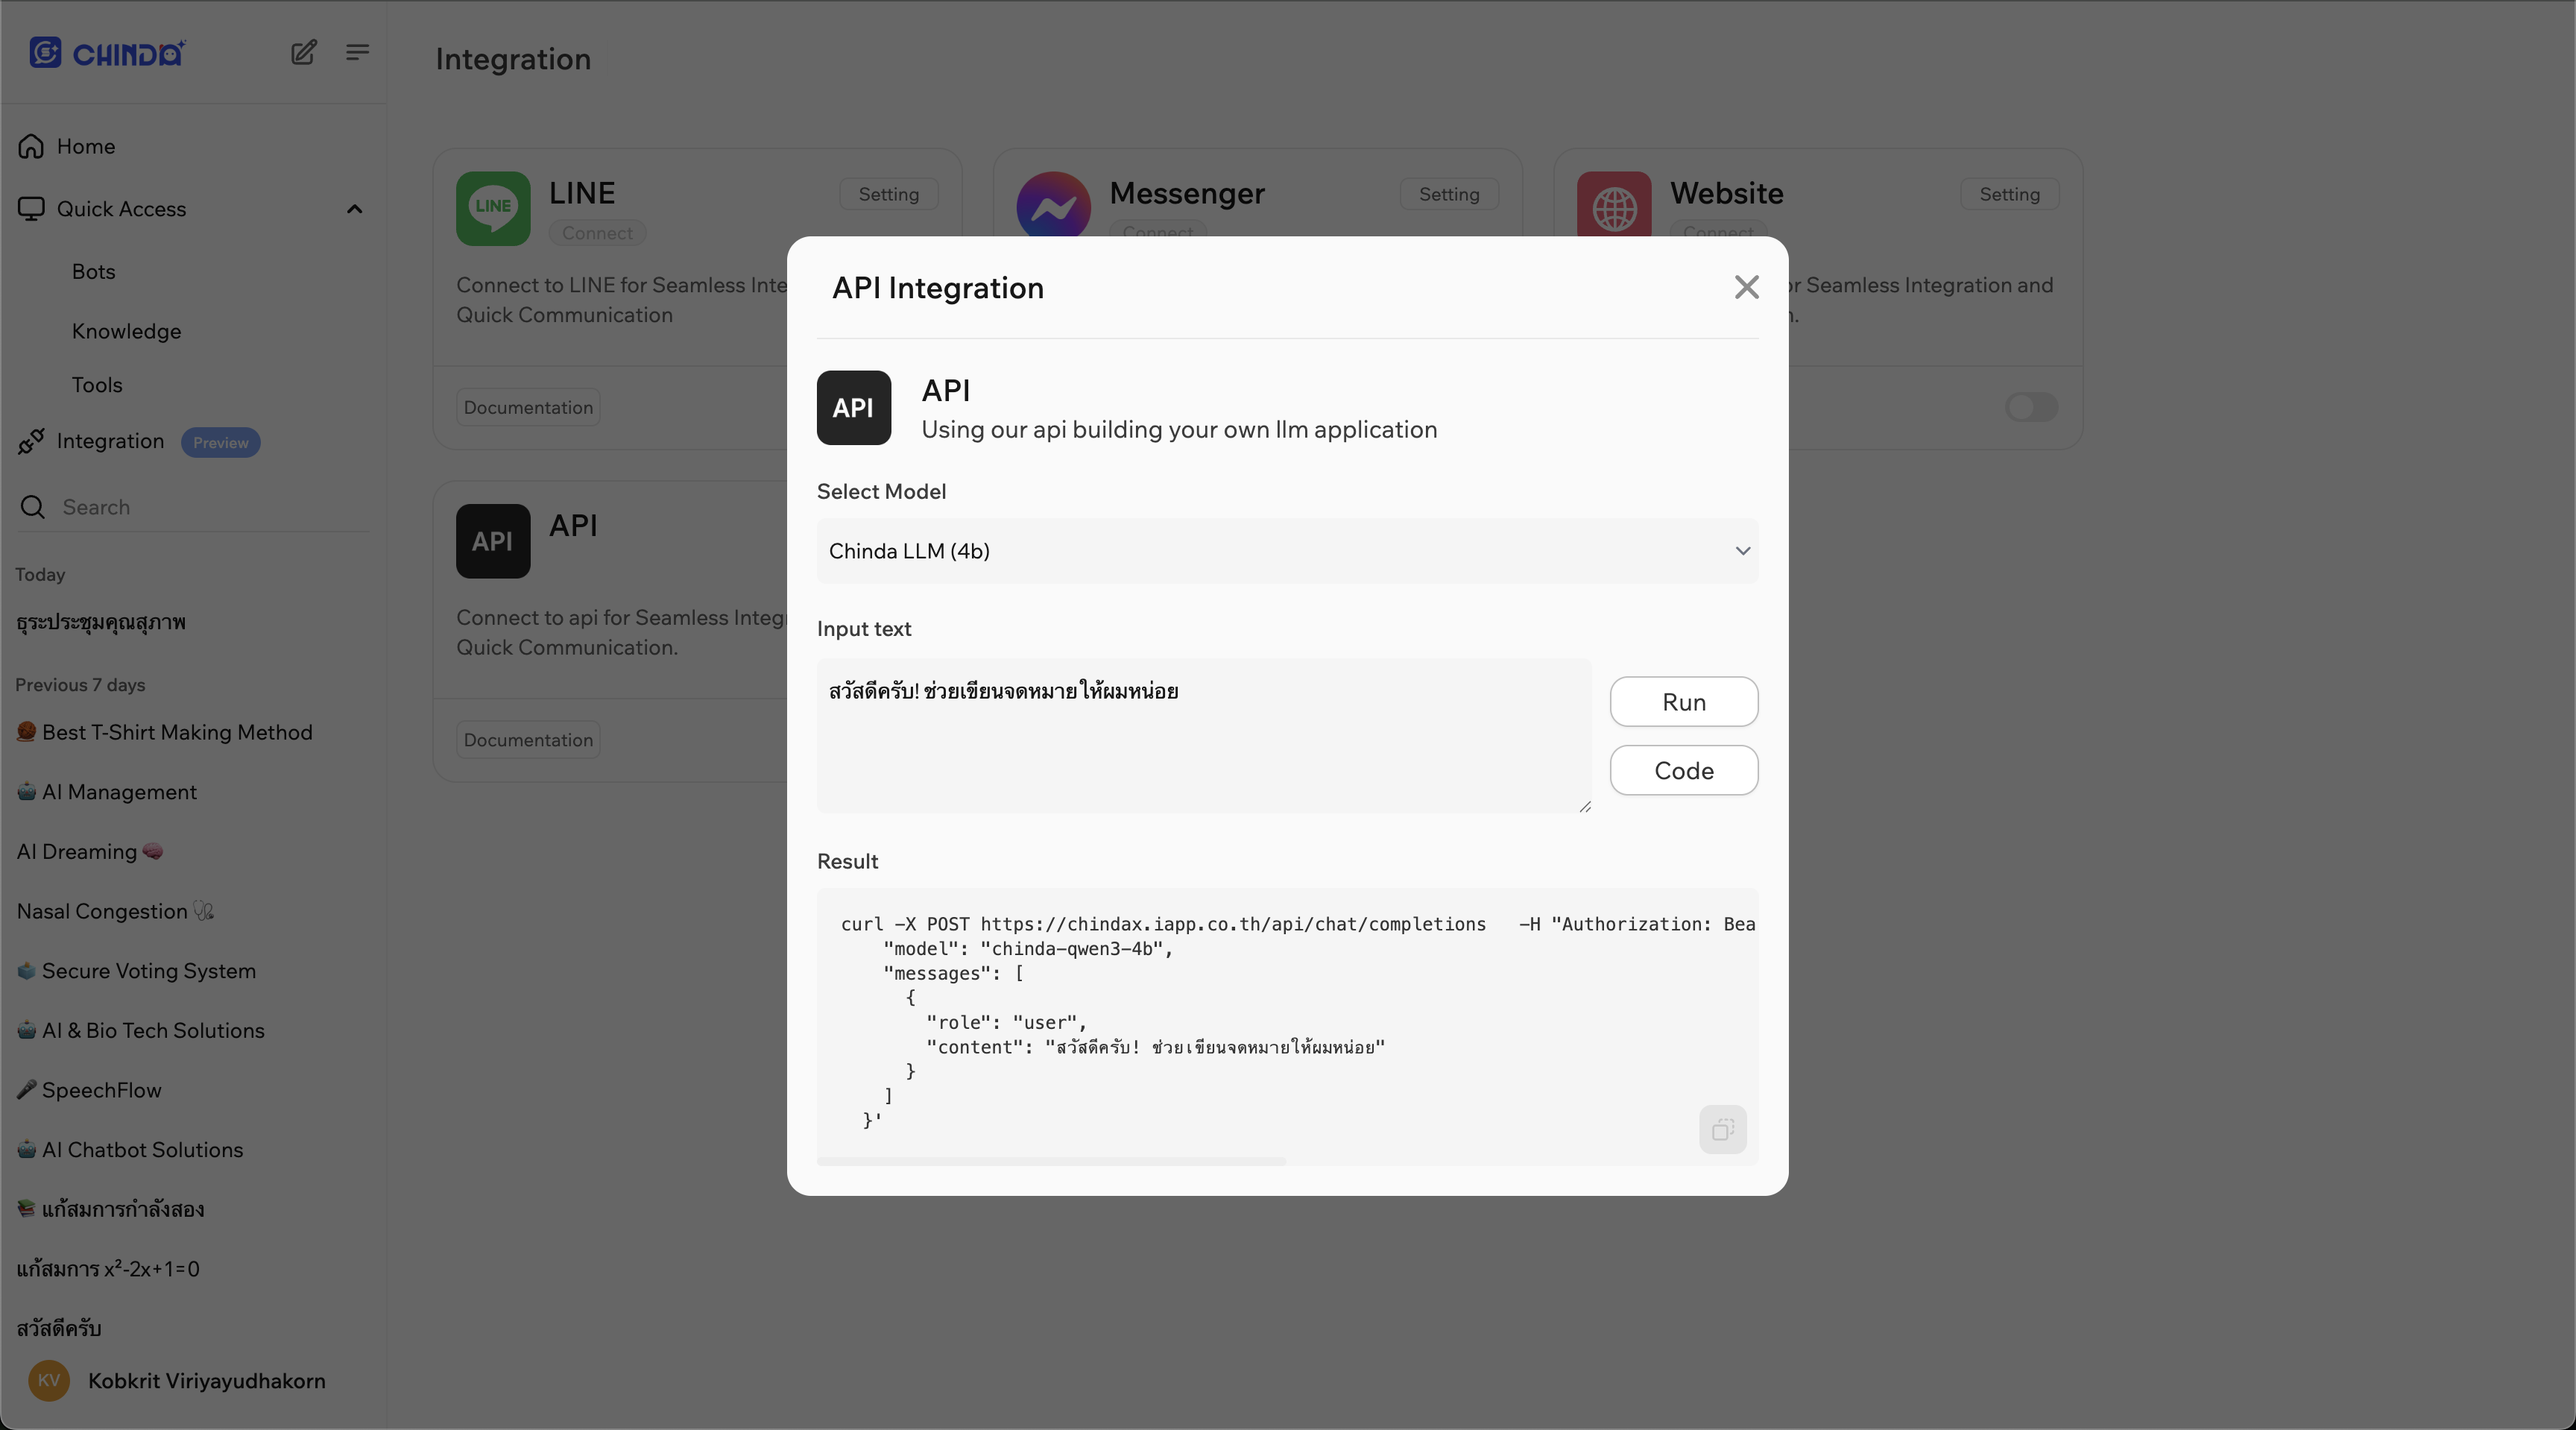
- Open ChindaX platform in your browser (https://chindax.iapp.co.th)
- Register / Login into the ChindaX website.
- Go to Integrations menu at the left.
- Click at Setting button at the top right of API integration.
- Copy URL and Bearer Token from the code block.
⚙️ Step 3: Creating Your First Workflow
Basic Workflow Setup
- Open n8n in your browser (
http://localhost:5678) - Click "New Workflow" to create a new automation
- Add nodes to create your AI workflow
Example 1: Simple Text Processing Workflow
Step 1: Add Manual Trigger
- Click the "+" button to add a node
- Search for "Manual Trigger" and select it
- Click "Execute Node" to test
Step 2: Add HTTP Request Node

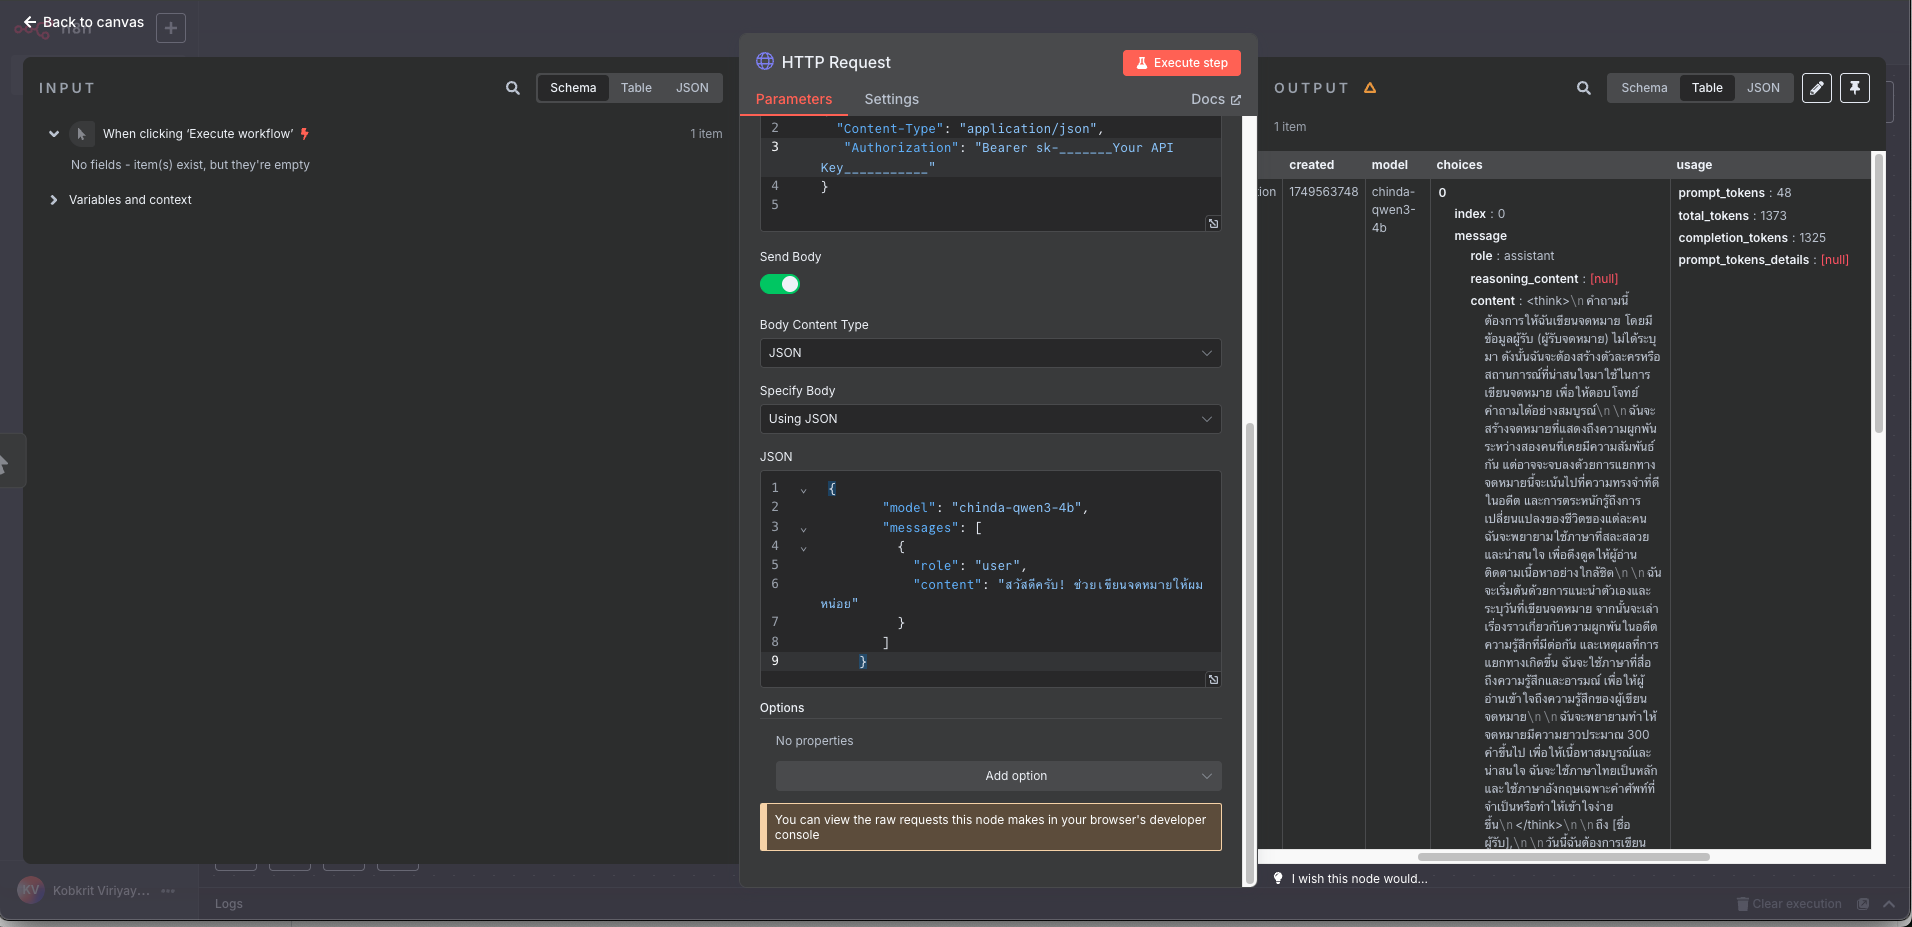
- Add another node and search for "HTTP Request"
- Configure the HTTP Request node:
- Method: POST
- URL:
http://localhost:11434/api/generateorhttps://chindax.iapp.co.th/api/chat/completions(from ChindaX) - Headers: If you get API from ChindaX, don't forgot to add "Authorization" key.
{
  "Content-Type": "application/json",
  "Authorization": "Bearer sk-********************",
} - Body: (for Ollama)
{
  "model": "iapp/chinda-qwen3-4b",
  "prompt": "สวัสดีครับ ช่วยอธิบายเกี่ยวกับปัญญาประดิษฐ์ให้ฟังหน่อย",
  "stream": false
} - Body: (for ChindaX)
{
   "model": "chinda-qwen3-4b",
   "messages": [
     {
       "role": "user",
       "content": "สวัสดีครับ! ช่วยเขียนจดหมายให้ผมหน่อย"
     }
   ]
}
Step 3: Add Set Node (Optional)
- Add a "Set" node to format the response
- Configure to extract the AI response:
- Keep Only Set: Enable
- Values to Set:
- Name:
ai_response - Value:
{{ $json.response }}
- Name:
Example 2: Email Processing Workflow
This workflow automatically processes Thai emails and generates responses.
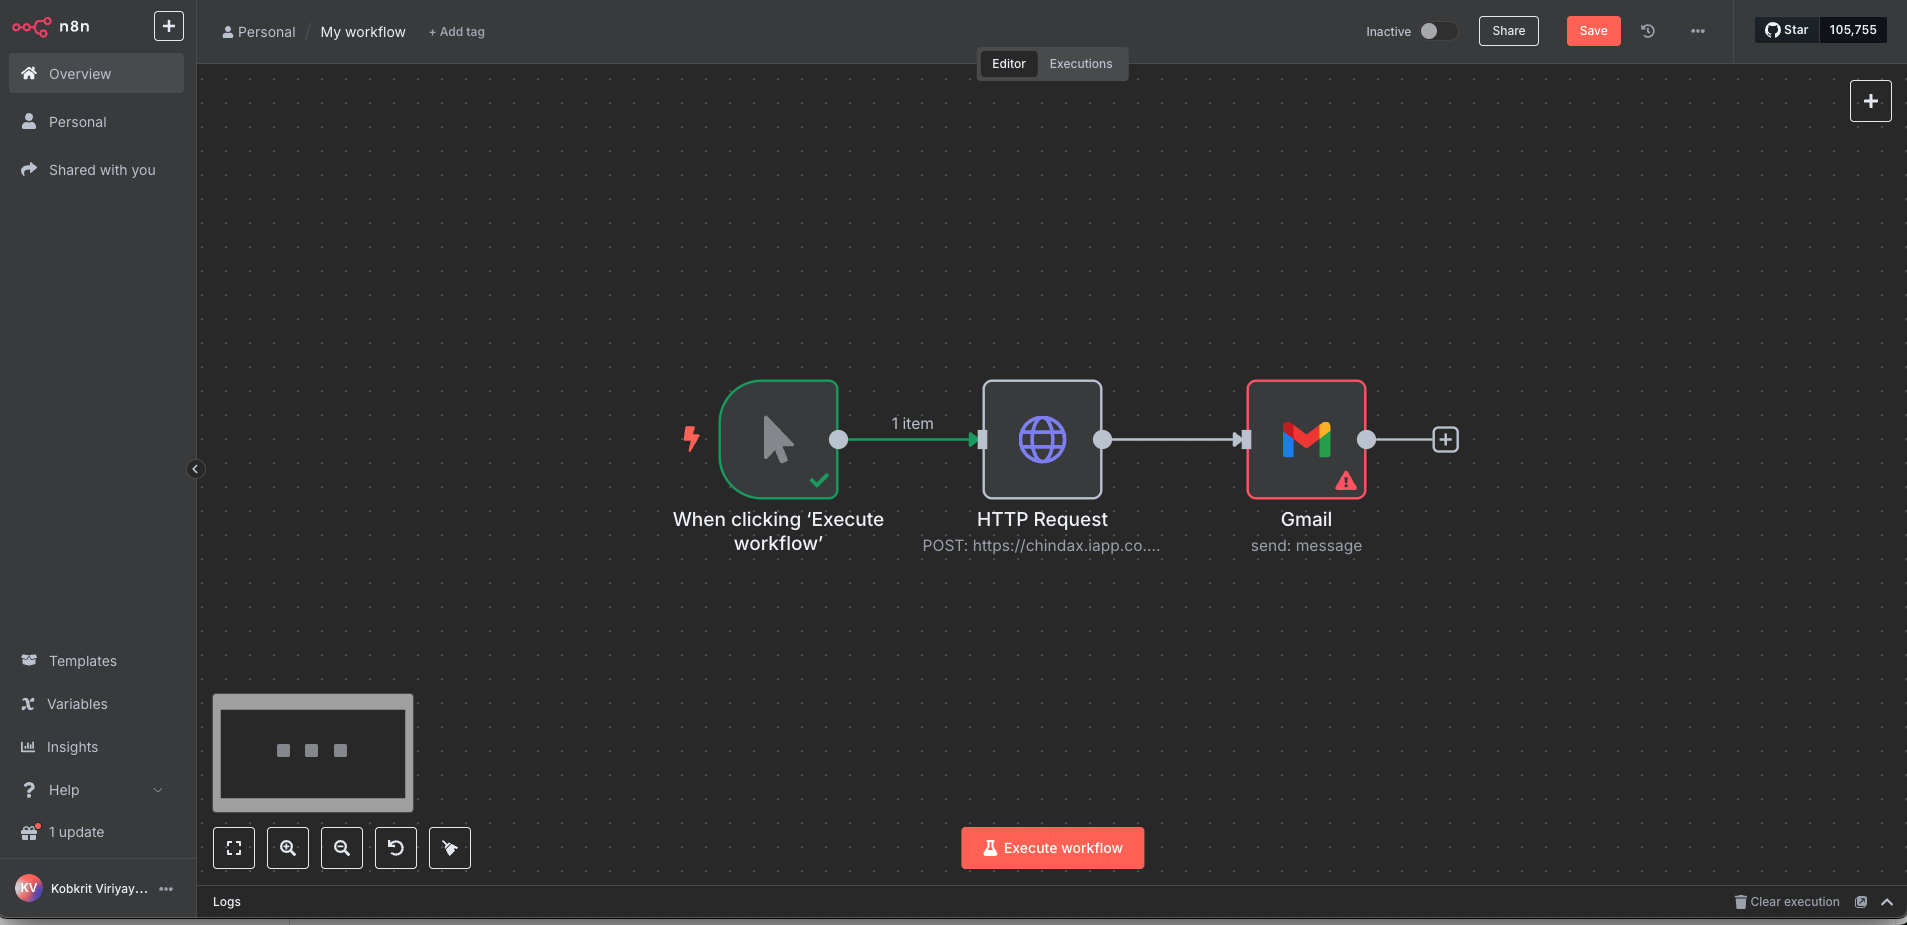
Workflow Structure:
Email Trigger → Extract Email Content → Chinda LLM Processing → Send Response
Step 1: Add Email Trigger
- Add "Email Trigger (IMAP)" node
- Configure your email settings:
- Host: Your email provider's IMAP server
- Port: Usually 993 for SSL
- Username: Your email address
- Password: Your email password
- SSL/TLS: Enable
Step 2: Process with Chinda LLM
- Add "HTTP Request" node
- Configure for Chinda LLM:
{
  "model": "iapp/chinda-qwen3-4b",
  "prompt": "ช่วยตอบอีเมลนี้อย่างสุภาพและเป็นมิตร: {{ $json.text }}",
  "stream": false
}
Step 3: Send Response Email
- Add "Send Email" node
- Configure response settings:
- To:
{{ $json.from.value[0].address }} - Subject:
Re: {{ $json.subject }} - Text:
{{ $json.response }}
- To:
🌐 Step 4: Advanced Workflows
Workflow 1: Document Translation Service
Components:
- Webhook Trigger: Receive documents via HTTP
- Extract Text: Process different file formats
- Chinda LLM: Translate Thai ↔ English
- Return Response: Send translated content
Setup:
-
Add Webhook node:
- Set webhook path:
/translate - Method: POST
- Set webhook path:
-
Add Switch node (for file type detection):
- Condition 1: PDF files
- Condition 2: Text files
- Condition 3: Word documents
-
Add HTTP Request for Chinda LLM:
{
  "model": "iapp/chinda-qwen3-4b",
  "prompt": "กรุณาแปลข้อความนี้จากภาษาไทยเป็นภาษาอังกฤษ: {{ $json.text }}",
  "stream": false
}
Workflow 2: Customer Support Chatbot
Components:
- Chat Trigger: Connect to messaging platforms
- Context Management: Maintain conversation history
- Chinda LLM: Generate responses
- Response Formatting: Format for different platforms
Setup:
-
Add Telegram Trigger (or your preferred platform)
-
Add Function node for context management:
// Store conversation context
const userId = $input.first().json.message.from.id;
const message = $input.first().json.message.text;

// Retrieve previous context (implement your storage logic)
const context = await getContext(userId);

return {
  userId,
  message,
  context: context || [],
  fullPrompt: `บริบทการสนทนา: ${context.join('\n')}\nคำถามใหม่: ${message}\nตอบ:`
}; -
Add Chinda LLM processing
-
Add response node back to the chat platform
Workflow 3: Content Generation Pipeline
For Blog Posts and Articles:
- Schedule Trigger: Run daily/weekly
- RSS Feed Reader: Get topic ideas
- Chinda LLM: Generate Thai content
- Content Formatting: Add HTML/Markdown
- CMS Publishing: Auto-publish to WordPress/Ghost
💬 Step 5: Using Chinda LLM Node (Custom Integration)
Creating a Custom Chinda LLM Node
If you frequently use Chinda LLM, create a reusable custom node:
Step 1: Create Node Template
{
  "name": "Chinda LLM",
  "icon": "🤖",
  "group": ["AI"],
  "description": "Process text with Chinda LLM 4B",
  "properties": [
    {
      "displayName": "Prompt",
      "name": "prompt",
      "type": "string",
      "required": true,
      "default": "",
      "description": "Text prompt in Thai"
    },
    {
      "displayName": "Temperature",
      "name": "temperature",
      "type": "number",
      "default": 0.7,
      "description": "Controls randomness (0-1)"
    }
  ]
}
Using Code Node for Advanced Processing
Add a "Code" node for complex Thai text processing:
// Process Thai text with Chinda LLM
const axios = require('axios');

const prompt = $input.first().json.text;

const response = await axios.post('http://localhost:11434/api/generate', {
  model: 'iapp/chinda-qwen3-4b',
  prompt: `ประมวลผลข้อความนี้: ${prompt}`,
  stream: false,
  options: {
    temperature: 0.7,
    top_p: 0.9
  }
});

return {
  original: prompt,
  processed: response.data.response,
  timestamp: new Date().toISOString()
};
🔧 Troubleshooting
Common Issues and Solutions
Issue: Connection Refused to Ollama
Error: connect ECONNREFUSED 127.0.0.1:11434
Solution: Make sure Ollama is running:
ollama serve
Issue: n8n Workflow Timeout
Solution: Increase timeout in HTTP Request node:
- Set Timeout: 30000 (30 seconds)
- For longer responses, increase further
Issue: Memory Issues with Large Prompts
Solution:
- Break large texts into smaller chunks
- Use pagination in workflows
- Implement text summarization first
Issue: Thai Text Encoding Problems
Solution: Ensure proper UTF-8 encoding:
// In Code node
const text = Buffer.from(inputText, 'utf8').toString('utf8');
Performance Optimization Tips
- Use Batch Processing for multiple requests
- Implement Caching for frequently used prompts
- Set Appropriate Timeouts based on prompt complexity
- Monitor Resource Usage of Ollama process
🎯 Workflow Templates and Use Cases
✅ Ready-to-Use Workflow Templates
1. Document Summarization Service
- Input: Long Thai documents
- Process: Break into chunks → Summarize each → Combine
- Output: Concise Thai summary
2. Social Media Auto-Responder
- Trigger: New mentions/comments
- Process: Analyze sentiment → Generate appropriate response
- Action: Post response automatically
3. Email Newsletter Generator
- Schedule: Weekly trigger
- Process: Gather news → Generate Thai content → Format
- Action: Send to subscriber list
4. Customer Feedback Analyzer
- Input: Customer reviews/feedback
- Process: Sentiment analysis → Categorization → Response
- Output: Insights dashboard
5. Language Learning Assistant
- Input: English text from students
- Process: Translate → Explain grammar → Provide examples
- Output: Comprehensive learning material
🔄 Integration Examples
Integrate with Popular Services:
Google Sheets:
- Read data → Process with Chinda LLM → Write results
Slack/Discord:
- Monitor channels → Answer questions → Provide summaries
WordPress:
- Generate content → Auto-publish → SEO optimization
Shopify:
- Product descriptions → Customer support → Order processing
🚀 Advanced Configuration
Environment Variables Setup
Create .env file for n8n:
# n8n Configuration
N8N_BASIC_AUTH_ACTIVE=true
N8N_BASIC_AUTH_USER=admin
N8N_BASIC_AUTH_PASSWORD=yourpassword

# Ollama Configuration
OLLAMA_HOST=http://localhost:11434
CHINDA_MODEL=iapp/chinda-qwen3-4b

# Webhook Configuration
WEBHOOK_URL=http://localhost:5678/webhook
Docker Compose Setup
version: '3.8'
services:
  n8n:
    image: n8nio/n8n
    ports:
      - "5678:5678"
    environment:
      - N8N_BASIC_AUTH_ACTIVE=true
      - N8N_BASIC_AUTH_USER=admin
      - N8N_BASIC_AUTH_PASSWORD=yourpassword
    volumes:
      - ~/.n8n:/home/node/.n8n
    depends_on:
      - ollama

  ollama:
    image: ollama/ollama
    ports:
      - "11434:11434"
    volumes:
      - ollama:/root/.ollama
    command: serve

volumes:
  ollama:
Run with:
docker-compose up -d
📊 Monitoring and Analytics
Workflow Performance Tracking
Add monitoring nodes to track:
- Response times from Chinda LLM
- Success/failure rates of workflows
- Usage statistics per workflow
- Cost tracking (if using paid APIs)
Example Monitoring Workflow:
Workflow Execution → Log Performance → Update Dashboard → Send Alerts
🔮 Best Practices
1. Prompt Engineering for Thai Language
- Use clear, contextual Thai prompts
- Provide examples when needed
- Specify output format requirements
2. Error Handling
- Always add error handling nodes
- Implement retry mechanisms
- Log errors for debugging
3. Security Considerations
- Use environment variables for sensitive data
- Implement proper authentication
- Validate inputs before processing
4. Scalability
- Design workflows to handle varying loads
- Use queues for high-volume processing
- Monitor resource consumption
📚 Resources and Links
Quick Reference Commands
# Start n8n
npm start n8n
# or
npx n8n
# or
docker run -p 5678:5678 n8nio/n8n

# Start Ollama
ollama serve

# Download Chinda LLM
ollama pull iapp/chinda-qwen3-4b
Useful Links
- 🌐 n8n Documentation: https://docs.n8n.io/
- 🤖 Chinda LLM Demo: https://chindax.iapp.co.th
- 📦 Ollama: https://ollama.com/iapp/chinda-qwen3-4b
- 🏠 iApp Homepage: https://iapp.co.th/openmodels/chinda-opensource-llm
- 📄 License: Apache 2.0 (Commercial and personal use allowed)
Community and Support
- n8n Community: https://community.n8n.io/
- iApp Support: https://iapp.co.th/contact
- GitHub Issues: https://github.com/n8n-io/n8n/issues
🎉 Summary
Combining Chinda LLM 4B with n8n creates powerful automation workflows that can process Thai language content at scale. Whether you're building customer support systems, content generation pipelines, or data processing workflows, this combination provides:
- Easy Visual Workflow Creation - No coding required
- Powerful Thai Language Processing - Native Thai AI capabilities
- Flexible Integration - Connect with hundreds of services
- Scalable Architecture - Handle workflows from simple to complex
- Cost-Effective - Run locally with no API costs
Start building your Thai AI automation workflows today with n8n and Chinda LLM 4B!
Built with ❤️ by iApp Technology Team - Empowering Thai AI Automation