AI API คือ�อะไร? คู่มือสำหรับผู้เริ่มต้นพร้อมบทเรียนเชิงปฏิบัติ

โดย ดร.กอบกฤตย์ วิริยะยุทธกร, CEO & Founder, iApp Technology
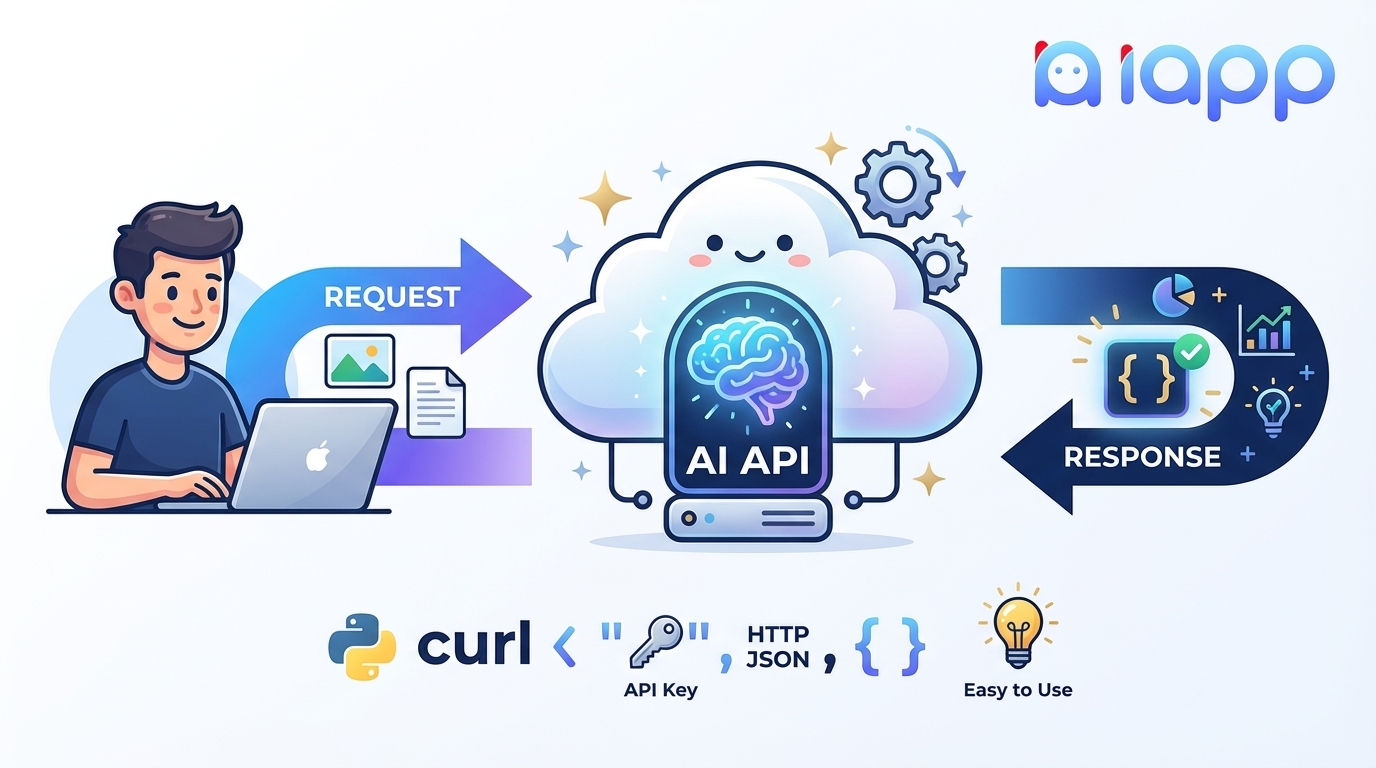
คุณเคยสงสัยไหมว่าแอปพลิเคชันอย่าง Google Translate, ฟิลเตอร์หน้าใน Instagram หรือผู้ช่วยเสียงอย่าง Siri ทำงานได้อย่างไร? เบื้องหลังฟีเจอร์เหล่านี้คือเทคโนโลยีที่ทรงพลังที่เรียกว่า AI API ในคู่มือนี้ เราจะอธิบายอย่างละเอียดว่า AI API คืออะไร ทำงานอย่างไร และที่สำคัญที่สุด - คุณจะได้สร้างแอปพลิเคชันที่ใช้ AI ตัวแรกของคุณเมื่ออ่านจบบทความนี้!
ส่วนที่ 1: ทำความเข้าใจพื้นฐาน
API คืออะไร?
ก่อนที่จะเข้าสู่ AI API มาทำความเข้าใจก่อนว่า API คืออะไร
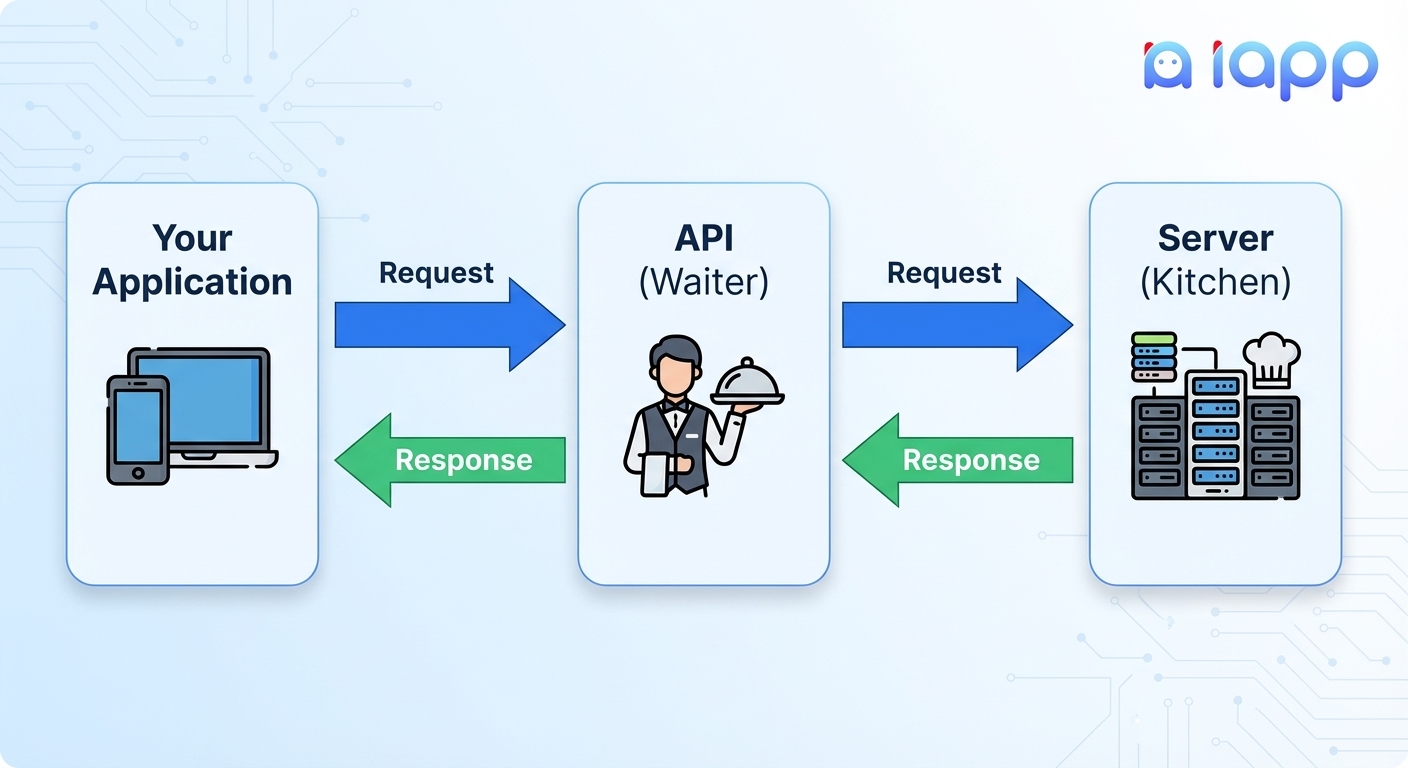
API ย่อมาจาก Application Programming Interface ลองนึกภาพว่ามันเหมือน พนักงานเสิร์ฟในร้านอาหาร:
- คุณ (ลูกค้า) ต้องการสั่งอาหาร
- ห้องครัว สามารถปรุงอาหารได้
- พนักงานเสิร์ฟ (API) รับออเดอร์ของคุณไปยังห้องครัวและนำอาหารกลับมาให้คุณ
ในโลกเทคโนโลยี:
- คุณ = แอปพลิเคชันของคุณ (เว็บไซต์, แอปมือถือ, ซอฟต์แวร์)
- ห้องครัว = เซิร์ฟเวอร์ที่มีความสามารถพิเศษ
- พนักงานเสิร์ฟ (API) = อินเทอร์เฟซที่ให้คุณสื่อสารกับเซิร์ฟเวอร์นั้นได้
ตัวอย่าง API ในชีวิตจริง
คุณใช้ API ทุกวันโดยไม่รู้ตัว:
| เมื่อคุณ... | คุณกำลังใช้... |
|---|---|
| เช็คสภาพอากาศบนมือถือ | Weather API |
| จ่ายเงินด้วยบัตรเครดิตออนไลน์ | Payment API (Stripe, PayPal) |
| ล็อกอินด้วย Google/Facebook | OAuth API |
| ดูแผนที่ในแอป | Google Maps API |
| แชร์ไปโซเชียลมีเดีย | Social Media APIs |
AI API คืออะไร?
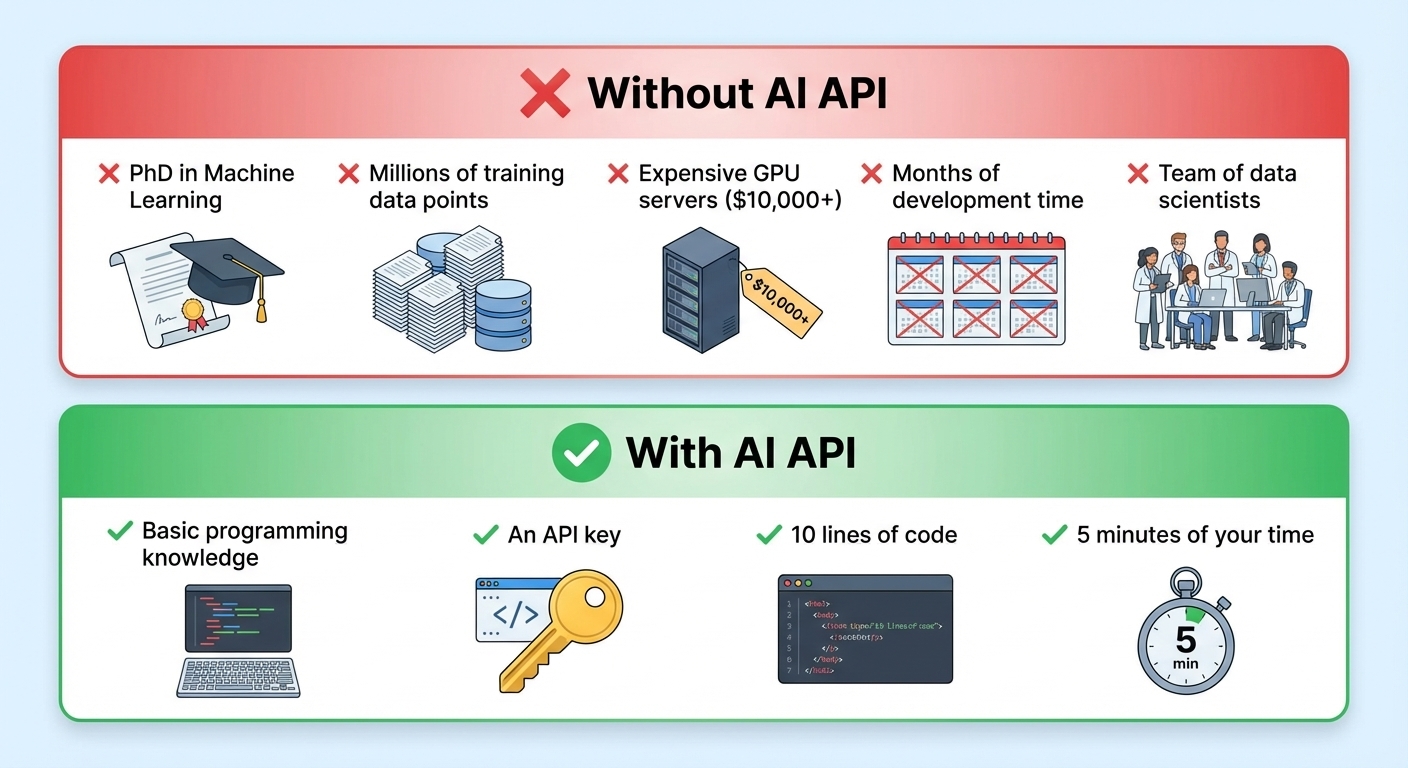
AI API คือ API ที่ให้บริการ ความสามารถของปัญญาประดิษฐ์ แทนที่จะสร้าง AI Model ที่ซับซ้อนด้วยตัวเอง (ซึ่งต้องใช้ความเชี่ยวชาญ ข้อมูล และพลังการประมวลผล) คุณเพียงแค่ส่ง Request ไปยัง AI API และรับผลลัพธ์อัจฉริยะกลับมา
AI API = AI as a Service
ประเภทของ AI APIs
| หมวดหมู่ | ทำอะไรได้ | ตัวอย่าง |
|---|---|---|
| Computer Vision | วิเคราะห์รูปภาพและวิดีโอ | OCR, ตรวจจับใบหน้า, จดจำวัตถุ |
| Natural Language Processing (NLP) | เข้าใจและสร้างข้อความ | แปลภาษา, วิเคราะห์ความรู้สึก, Chatbot |
| Speech | แปลงเสียงเป็นข้อความและกลับกัน | Speech-to-Text, Text-to-Speech |
| Generative AI | สร้างเนื้อหาใหม่ | ChatGPT, สร้างรูปภาพ, สร้างโค้ด |
AI API ทำงานอย่างไร?
มาทำความเข้าใจ Flow การทำงานทั้งหมดของ AI API:
ขั้นตอนการทำงาน
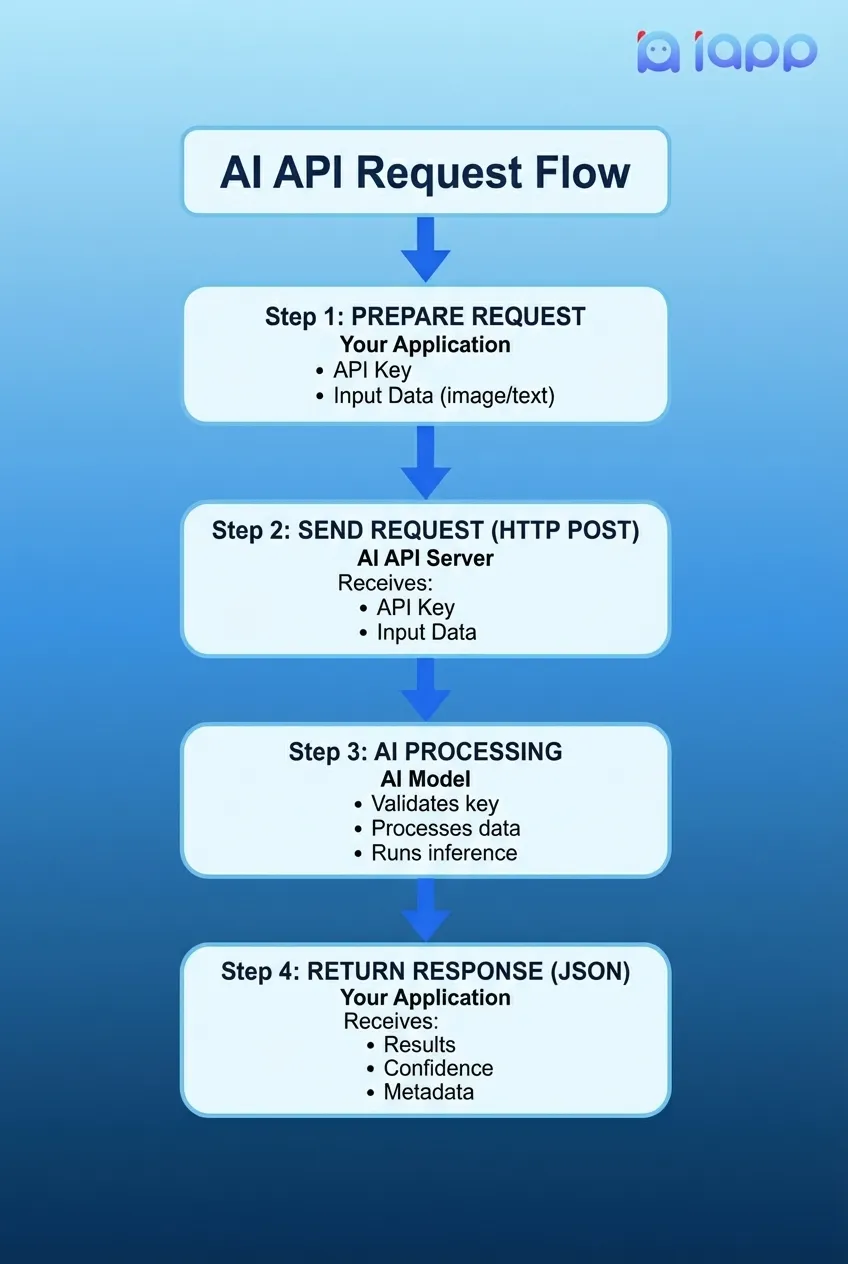
วงจร Request-Response
1. ส่วนประกอบของ Request
ทุก AI API Request มักประกอบด้วย:
{
  // ส่งไปที่ไหน
  "url": "https://api.iapp.co.th/thai-national-id-card/v3/front",

  // ยืนยันตัวตนอย่างไร
  "headers": {
    "apikey": "your-secret-api-key"
  },

  // ข้อมูลที่ต้องการประมวลผล
  "body": {
    "file": "<รูปภาพหรือข้อความของคุณ>"
  }
}
2. ส่วนประกอบของ Response
AI API จะส่ง Response กลับมาในรูปแบบที่มีโครงสร้าง:
{
  // ผลลัพธ์จากการวิเคราะห์ของ AI
  "result": {
    "id_number": "1234567890123",
    "name_th": "นายทดสอบ ตัวอย่าง",
    "name_en": "Mr. Test Example",
    "date_of_birth": "01 ม.ค. 2533"
  },

  // AI มั่นใจแค่ไหน
  "confidence": 0.98,

  // ข้อมูลการประมวลผล
  "processing_time_ms": 245
}
ส่วนที่ 2: บทเรียนเชิงปฏิบัติ - API Call แรกของคุณ
ตอนนี้มาสร้างอะไรจริงๆ กัน! เราจะใช้ iApp Technology Thai AI APIs เพื่อสร้างแอปพลิเคชันที่ใช้ AI ตัวแรกของคุณ
สิ่งที่เราจะสร้าง
เราจะสร้างแอปพลิเคชันง่ายๆ ที่:
- วิเคราะห์ความรู้สึก ของข้อความภาษาไทย (บวก/ลบ/กลาง)
- แยกข้อมูล จากรูปบัตรประชาชนไทย
สิ่งที่ต้องมี
- ความเข้าใจพื้นฐานเกี่ยวกับภาษาโปรแกรม
- คอมพิวเตอร์ที่เชื่อมต่ออินเทอร์เน็ต
- เวลา 15 นาที
ขั้นตอนที่ 1: รับ API Key ฟรี
- ไปที่ https://iapp.co.th/register
- สร้างบัญชีฟรี
- ไปที่ส่วน API Keys
- คลิก Create New API Key
- คัดลอก API Key ของคุณ (เก็บไว้อย่างปลอดภัย!)
บัญชีใหม่จะได้รับเครดิตฟรีสำหรับทดสอบ API!
ขั้นตอนที่ 2: API Call แรก - วิเคราะห์ความรู้สึก
มาวิเคราะห์ความรู้สึกของข้อความภาษาไทยกัน API นี้จะบอกว่าข้อความเป็นบวก ลบ หรือกลาง
ใช้ cURL (Terminal/Command Line)
curl -X POST "https://api.iapp.co.th/sentimental-analysis/predict" \
  -H "apikey: YOUR_API_KEY" \
  -d "text=วันนี้อากาศดีมาก ฉันมีความสุขจัง"
ใช้ Python
import requests

# การตั้งค่า
API_KEY = "YOUR_API_KEY"  # ใส่ API Key จริงของคุณ
API_URL = "https://api.iapp.co.th/sentimental-analysis/predict"

# ข้อความภาษาไทยที่ต้องการวิเคราะห์
thai_text = "วันนี้อากาศดีมาก ฉันมีความสุขจัง"

# ส่ง API Request
response = requests.post(
    API_URL,
    headers={"apikey": API_KEY},
    params={"text": thai_text}
)

# แปลง Response
result = response.json()

# แสดงผลลัพธ์
print(f"ข้อความ: {thai_text}")
print(f"ความรู้สึก: {result['label']}")  # pos, neg, หรือ neu
print(f"ความเชื่อมั่น: {result['score']:.2%}")
ผลลัพธ์ที่คาดหวัง:
ข้อความ: วันนี้อากาศดีมาก ฉันมีความสุขจัง
ความรู้สึก: pos
ความเชื่อมั่น: 89.45%
ใช้ JavaScript (Node.js)
const axios = require('axios');

// การตั้งค่า
const API_KEY = 'YOUR_API_KEY';  // ใส่ API Key จริงของคุณ
const API_URL = 'https://api.iapp.co.th/sentimental-analysis/predict';

// ข้อความภาษาไทยที่ต้องการวิเคราะห์
const thaiText = 'วันนี้อากาศดีมาก ฉันมีความสุขจัง';

// ส่ง API Request
async function analyzeSentiment() {
  try {
    const response = await axios.post(
      `${API_URL}?text=${encodeURIComponent(thaiText)}`,
      {},
      {
        headers: { 'apikey': API_KEY }
      }
    );

    console.log(`ข้อความ: ${thaiText}`);
    console.log(`ความรู้สึก: ${response.data.label}`);
    console.log(`ความเชื่อมั่น: ${(response.data.score * 100).toFixed(2)}%`);
  } catch (error) {
    console.error('Error:', error.message);
  }
}

analyzeSentiment();
ใช้ JavaScript (Browser/Frontend)
<!DOCTYPE html>
<html>
<head>
<title>วิเคราะห์ความรู้สึกภาษาไทย</title>
</head>
<body>
<h1>วิเคราะห์ความรู้สึกภาษาไทย</h1>
<textarea id="textInput" placeholder="พิมพ์ข้อความภาษาไทย..."></textarea>
<button onclick="analyze()">วิเคราะห์</button>
<div id="result"></div>
<script>
async function analyze() {
const text = document.getElementById('textInput').value;
const API_KEY = 'YOUR_API_KEY';
const response = await fetch(
`https://api.iapp.co.th/sentimental-analysis/predict?text=${encodeURIComponent(text)}`,
{
method: 'POST',
headers: { 'apikey': API_KEY }
}
);
const data = await response.json();
const sentimentEmoji = {
'pos': '😊 เชิงบวก',
'neg': '😢 เชิงลบ',
'neu': '😐 กลางๆ'
};
document.getElementById('result').innerHTML = `
`;
}
</script>
</body>
</html>
ขั้นตอนที่ 3: OCR API - แยกข้อมูลจากบัตรประชาชน
ตอนนี้มาลองสิ่งที่ซับซ้อนขึ้น - การแยกข้อมูลจากรูปบัตรประชาชนไทย
ใช้ Python
import requests

# การตั้งค่า
API_KEY = "YOUR_API_KEY"
API_URL = "https://api.iapp.co.th/thai-national-id-card/v3/front"

# Path ไปยังรูปบัตรประชาชน
image_path = "thai_id_card.jpg"

# เตรียมไฟล์
with open(image_path, 'rb') as image_file:
    files = {'file': image_file}
    headers = {'apikey': API_KEY}

    # ส่ง API Request
    response = requests.post(API_URL, headers=headers, files=files)

# แสดงผลลัพธ์
result = response.json()

print("=== ผลลัพธ์ OCR บัตรประชาชน ===")
print(f"เลขประจำตัว: {result.get('id_number', 'N/A')}")
print(f"ชื่อภาษาไทย: {result.get('name_th', 'N/A')}")
print(f"ชื่อภาษาอังกฤษ: {result.get('name_en', 'N/A')}")
print(f"วันเกิด: {result.get('date_of_birth', 'N/A')}")
print(f"ที่อยู่: {result.get('address', 'N/A')}")
ผลลัพธ์ที่คาดหวัง:
=== ผลลัพธ์ OCR บัตรประชาชน ===
เลขประจำตัว: 1-2345-67890-12-3
ชื่อภาษาไทย: นาย ทดสอบ ตัวอย่าง
ชื่อภาษาอังกฤษ: Mr. Test Example
วันเกิด: 01 ม.ค. 2533
ที่อยู่: 123 ถนนสุขุมวิท แขวงคลองตัน เขตวัฒนา กรุงเทพฯ 10110
ใช้ JavaScript (Node.js)
const axios = require('axios');
const FormData = require('form-data');
const fs = require('fs');

// การตั้งค่า
const API_KEY = 'YOUR_API_KEY';
const API_URL = 'https://api.iapp.co.th/thai-national-id-card/v3/front';

async function extractIdCard() {
  // สร้าง form data พร้อมรูปภาพ
  const formData = new FormData();
  formData.append('file', fs.createReadStream('thai_id_card.jpg'));

  try {
    const response = await axios.post(API_URL, formData, {
      headers: {
        'apikey': API_KEY,
        ...formData.getHeaders()
      }
    });

    const result = response.data;

    console.log('=== ผลลัพธ์ OCR บัตรประชาชน ===');
    console.log(`เลขประจำตัว: ${result.id_number || 'N/A'}`);
    console.log(`ชื่อภาษาไทย: ${result.name_th || 'N/A'}`);
    console.log(`ชื่อภาษาอังกฤษ: ${result.name_en || 'N/A'}`);
    console.log(`วันเกิด: ${result.date_of_birth || 'N/A'}`);
  } catch (error) {
    console.error('Error:', error.message);
  }
}

extractIdCard();
ส่วนที่ 3: แนวทางปฏิบัติที่ดีสำหรับการใช้ AI APIs
1. รักษาความปลอดภัย API Key
# ❌ ไม่ดี - อย่า Hardcode API Key
API_KEY = "sk-1234567890abcdef"

# ✅ ดี - ใช้ Environment Variables
import os
API_KEY = os.environ.get('IAPP_API_KEY')
2. จัดการ Error อย่างเหมาะสม
import requests

def analyze_sentiment(text):
    try:
        response = requests.post(
            API_URL,
            headers={"apikey": API_KEY},
            params={"text": text},
            timeout=30  # กำหนด timeout
        )

        # ตรวจสอบ HTTP errors
        response.raise_for_status()

        return response.json()

    except requests.exceptions.Timeout:
        print("Request หมดเวลา กรุณาลองใหม่")
    except requests.exceptions.HTTPError as e:
        if e.response.status_code == 401:
            print("API Key ไม่ถูกต้อง")
        elif e.response.status_code == 429:
            print("เกินจำนวน Request ที่กำหนด กรุณารอสักครู่")
        else:
            print(f"HTTP Error: {e}")
    except requests.exceptions.RequestException as e:
        print(f"Request ล้มเหลว: {e}")

    return None
3. ใช้ Retry Logic
import time
import requests

def api_call_with_retry(url, headers, data, max_retries=3):
    for attempt in range(max_retries):
        try:
            response = requests.post(url, headers=headers, data=data)
            response.raise_for_status()
            return response.json()
        except requests.exceptions.RequestException as e:
            if attempt < max_retries - 1:
                wait_time = 2 ** attempt  # Exponential backoff
                print(f"ครั้งที่ {attempt + 1} ล้มเหลว ลองใหม่ใน {wait_time} วินาที...")
                time.sleep(wait_time)
            else:
                raise e
4. Cache ผลลัพธ์เมื่อเหมาะสม
from functools import lru_cache
import hashlib

@lru_cache(maxsize=100)
def cached_sentiment_analysis(text_hash):
    # Cache ผลลัพธ์สำหรับ Input ที่เหมือนกัน
    return analyze_sentiment_internal(text_hash)

def analyze_sentiment(text):
    text_hash = hashlib.md5(text.encode()).hexdigest()
    return cached_sentiment_analysis(text_hash)
ส่วนที่ 4: กรณีการใช้งาน AI API ที่พบบ่อย
E-KYC (Electronic Know Your Customer)
# ยืนยันตัวตนลูกค้าโดยเปรียบเทียบรูปในบัตรกับเซลฟี่
def verify_identity(id_card_image, selfie_image):
    # ขั้นตอนที่ 1: แยกใบหน้าจากบัตรประชาชน
    id_face = extract_face(id_card_image)

    # ขั้นตอนที่ 2: แยกใบหน้าจากเซลฟี่
    selfie_face = extract_face(selfie_image)

    # ขั้นตอนที่ 3: เปรียบเทียบใบหน้า
    match_result = compare_faces(id_face, selfie_face)

    return match_result['is_same_person'], match_result['confidence']
วิเคราะห์ Feedback ลูกค้า
# วิเคราะห์รีวิวลูกค้าจำนวนมาก
def analyze_customer_feedback(reviews):
    results = {
        'positive': 0,
        'negative': 0,
        'neutral': 0,
        'issues': []
    }

    for review in reviews:
        sentiment = analyze_sentiment(review['text'])
        results[sentiment['label']] += 1

        if sentiment['label'] == 'neg':
            results['issues'].append(review)

    return results
ระบบประมวลผลเอกสารอัตโนมัติ
# ประมวลผลใบแจ้งหนี้อัตโนมัติ
def process_invoice(invoice_image):
    # แยกข้อความจากใบแจ้งหนี้ด้วย OCR
    ocr_result = extract_text(invoice_image)

    # แยกข้อมูลที่มีโครงสร้าง
    invoice_data = {
        'invoice_number': extract_field(ocr_result, 'invoice_number'),
        'date': extract_field(ocr_result, 'date'),
        'total': extract_field(ocr_result, 'total'),
        'items': extract_line_items(ocr_result)
    }

    return invoice_data
ส่วนที่ 5: การเลือกผู้ให้บริการ AI API ที่เหมาะสม
ปัจจัยสำคัญที่ต้องพิจารณา
| ปัจจัย | คำถามที่ต้องถาม |
|---|---|
| ความแม่นยำ | อัตราความแม่นยำเป็นอย่างไร? ปรับแต่งสำ�หรับภาษา/กรณีใช้งานของคุณหรือไม่? |
| ความเร็ว | เวลาตอบสนองเฉลี่ยเป็นอย่างไร? |
| ราคา | จ่ายตามการใช้งานหรือรายเดือน? อัตราเป็นอย่างไร? |
| Support | มี Support ภาษาไทยหรือไม่? |
| ความปลอดภัย | ข้อมูลเข้ารหัสหรือไม่? สอดคล้องกับ GDPR/PDPA หรือไม่? |
| ความน่าเชื่อถือ | SLA uptime เป็นอย่างไร? |
ทำไมต้องเลือก iApp Technology
| คุณสมบัติ | iApp Technology |
|---|---|
| ปรับแต่งสำหรับภาษาไทย | AI Models ถูกฝึกมาโดยเฉพาะสำหรับภาษาไทย |
| Support ในประเทศ | ทีม Support ที่พูดภาษาไทย |
| การปฏิบัติตามกฎหมาย | สอดคล้องกับ PDPA และ GDPR |
| การรับรอง | ISO 29110, iBeta PAD Level 1 & 2 |
| ราคา | ราคาแข่งขันได้ จ่ายตามการใช้งาน |
| ทดลองฟรี | เครดิตฟรีสำหรับทดสอบ API |
สรุป
ในคู่มือนี้ คุณได้เรียนรู้:
- API คืออะไร - อินเทอร์เฟซสื่อสารระหว่างแอปพลิเคชัน
- AI API คืออะไร - ความสามารถ AI ที่ให้บริการแบบ Service
- AI API ทำงานอย่างไร - วงจร Request-Response
- วิธีเรียก AI API ครั้งแรก - พร้อมตัวอย่างโค้ดจริง
- แนวทางปฏิบัติที่ดี - ความปลอดภัย, การจัดการ Error, และการเพิ่มประสิทธิภาพ
- กรณีใช้งานที่พบบ่อย - E-KYC, วิเคราะห์ความรู้สึก, ประมวลผลเอกสาร
ขั้นตอนถัดไปของคุณ
- สมัครสมาชิก บัญชี iApp ฟรีที่ iapp.co.th/register
- รับ API Key จากแดชบอร์ด
- ลองตัวอย่าง ในบทเรียนนี้
- สำรวจ API เพิ่มเติม ใน เอกสารประกอบ
- สร้างสิ่งที่น่าทึ่ง!
แหล่งข้อมูล
เกี่ยวกับผู้เขียน
ดร.กอบกฤตย์ วิริยะยุทธกร เป็น CEO และผู้ก่อตั้ง iApp Technology บริษัท AI ชั้นนำของไทย มีประสบการณ์กว่า 15 ปี��ในด้านปัญญาประดิษฐ์และการประมวลผลภาษาธรรมชาติ ดร.กอบกฤตย์มีความมุ่งมั่นในการทำให้ AI เข้าถึงได้สำหรับนักพัฒนาและธุรกิจทุกขนาด
อ้างอิง
- IBM Developer, "What is an API?", 2024
- Google Cloud, "Machine Learning APIs", 2024
- AWS, "What is a REST API?", 2024
- iApp Technology, "API Documentation", 2025
- Postman, "The State of the API Report", 2024